Homemade DIY Truck Crane (Save Money, Save Your Back)
Homemade DIY pickup truck crane that can lift heavy loads, removes easily, folds for storage. Whether driving around town or visiting the local green waste dump, I frequently came across logs that were too heavy for me to lift. Therefore, I started looking around for a safe and easy way to haul these logs back to my shop.
I initially considered purchasing a commercial truck crane for $500 that I would bolt to the bed of my truck. However, I was not sure I wanted to lug an extra 170 pounds of weight everywhere I drove. I was also worried that a bolted down truck crane would get in my way when hauling other items like plywood. Would a crane even meet my needs? With concerns about making a poor purchasing decision, I decided to make my own truck crane.
My design goals were to build a truck crane that:
- Removes easily.
- Provides full access to the truck bed.
- Folds for easy stowing.
- Allows the ball mount (hitch) to be usable even when the crane was installed. (i.e., I could have both a trailer hooked up and still have access to the crane).
- Requires little or no modification (i.e., drilling holes) to my vehicle.
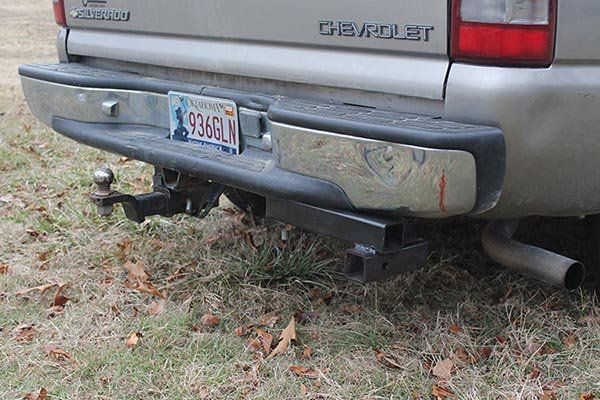
Step 1. Mount a Second Receiver Hitch for the Truck Crane
To meet these requirements, I decided the first step was to create and mount a second receiver hitch on my truck. I constructed this secondary receiver hitch from a few short pieces of square tubing. I used pre-existing holes in both the bumper and the frame, to determine its location. This second receiver hitch provided additional strength and stability. It also allowed me to position the crane to the side of the truck so it did not interfere with truck bed access.
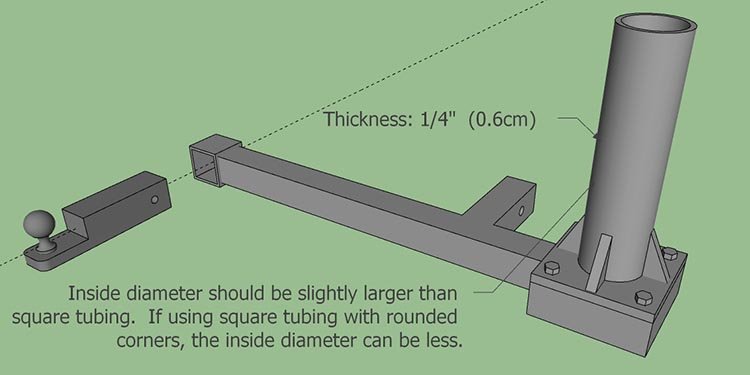
Step 2. Create the Bottom Portion of the Truck Crane.
Next, I created the bottom portion of the truck crane from some 2” square tubing and some round pipe. The bottom portion of the crane slides into the secondary receiver hitch and has a square opening that aligns with the main receiver. When I insert the ball mount into the main receiver hitch, it slides through this square opening securing the bottom portion of the crane. If I secure the hitch pin with a lock, then both the ball mount and the bottom part of the crane become theft resistant.
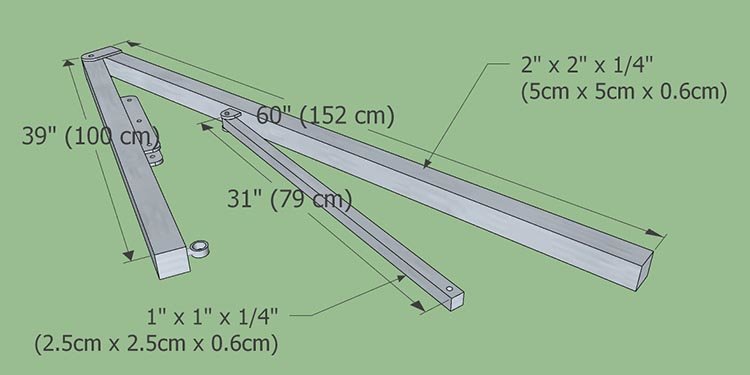
Step 3. Create the top part of the Truck Crane.
I made the top part of the crane from some 1” and 2” square tubing. Once assembled, I use a chain hoist to lift logs in the air.
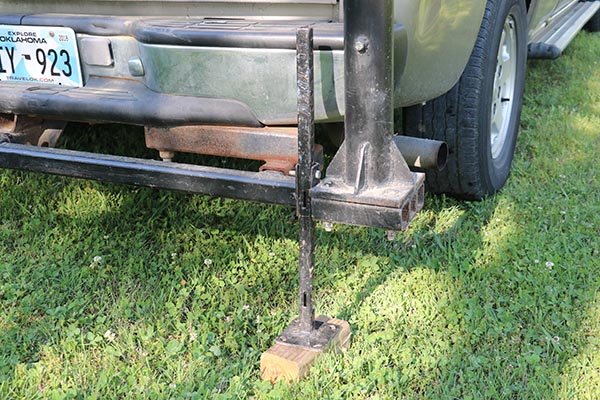
Step 4. Add an Outrigger and Stabilizer
If loading heavy items, you will want to add an outrigger / stabilizer to your truck crane. As shown in the image below make sure to place a block under the outrigger before loading. This way, after loading, you can drive your truck ahead a few inches and then remove the outrigger / stabilizer.
Cost of the Homemade Truck Crane
Fortunately, I had all the metal and even the chain hoist on hand. However, if I you had to buy everything, you would probably spend around $50 on metal and another $50 on a chain hoist. (Currently at Harbor Freight, a 1-ton (900kg) chain hoist sells for $45). With this crane, I can now select and load logs that are both longer and wider. This allows me cut the logs when I get home.
Advantages of Cutting Logs at Home.
If you are a woodworker or a woodturner you might want to cut your logs up at home for the following reasons.
- Allows you to more carefully study grain patterns and decide on bowl orientation before making any final cuts.
- Allows you to be more generous with removing end-grain checking. This is important since many cracks in bowls are because turners did not remove enough end-grain cracking.
- Allows you to turn larger bowls.
- Allows you to store the logs in an upright position to promote spalting. At which point, you can remove the insect damage on the ground and still have enough log left to meet my requirements.
Typically, in under 5 minutes, I can load a log onto the back of my truck. While not shown in the images or video above, the crane also has a small stabilizer or outrigger. When lifting loads over 500 pounds the outrigger helps transfer weight to the ground. This is important since the maximum tongue load on my bumper is only 500 pounds.
Overall, this homemade truck crane has allowed me to haul home some beautiful logs, while also saving my back. You might call it a thrifty, economical, frugal, or resourceful way of creating a truck crane. In addition to lifting logs, I can also use this DIY truck crane to lift generators and other heavy equipment.
Pin for later!
Looking for more WoodWorking Projects and Plans?

You will also find patterns of all 50 US States.
