Inlay Materials (12 Essential Tips to Save You Time and Frustration)
Following are some helpful tips for adding inlay materials to wood. If you are looking to enhance your pieces and add a little eye-catching excitement, you might want to consider inlays. Inlays are decorative features created by embedding pieces of a different material into the wood, typically flush with its surface. These decorative features can add instant appeal to almost any piece including pens, segmented work, bowls, platters, etc. You can use inlays on any shape or design you can imagine, even Lichtenberg figures created with electricity. Limitless shapes and patterns, combined with almost no limitations on the choice of materials creates endless design opportunities, allowing you to personalize your work. Knowing about different inlay materials and binders to adhere the inlays can save you time and frustration. Following are some pointers on wood and inlay materials to help save you time and frustration.

1. Avoid stones and minerals in the 1-3 and the 8-10 range on the Moh’s hardness scale.
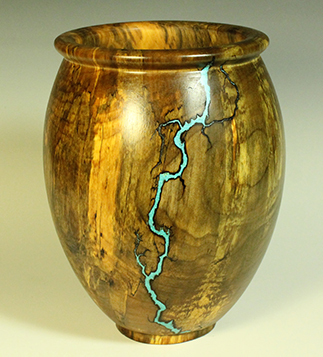
On the Moh’s hardness scale – talc (chalk) has a hardness of 1 and diamond has a hardness of 10. Most woodturners avoid stones in the 1-3 range (such as soapstone) because they do not provide enough durability. On the other hand, stones and minerals above 7 are difficult to turn and sand. Since aluminum oxide found in certain types of sandpaper has a hardness of 9, most turners avoid any stones in the 8-10 hardness range – because they would be almost impossible to sand. Crushed stones like turquoise with a hardness between 5 and 6 make a great choice for inlays.
2. Experiment with different stones and stone colors.
Try using both manmade and natural stones. Some commonly used stones include the following. Malachite typically has a vibrant green color. Magnesite typically looks like unglazed porcelain (i.e., white – with a dull luster). Pipestone typically varies from a light pink to a deep red. Turquoise typically has a greenish-blue or sky-blue color.

3. Consider using inlay materials to fill a variety of recesses.
Recesses which can be filled with an inlay material can include groves and rings created on the lathe, natural cracks and voids in the wood, freehand and predesigned patterns cut using carving tools, Lichtenberg figures created with electricity, etc.
4. Experiment with a variety of materials for inlays.
Today there is wide selection of materials for inlays including soft metals (e.g., aluminum, brass, and copper powders), coffee grinds, crushed stone, and crushed stone powder. Turners are also using dyed sawdust, specialized nuggets and powders, and even glow in the dark inlays.
5. Use a clear or transparent binder when working with inlays.
The goal is to find an adhesive, which is clear or transparent. This allows the color and texture of the inlay material to shine through. Once cured, both CA glue and epoxy are virtually crystal clear making them excellent adhesives for inlays. Avoid construction adhesives and most wood glues. Construction adhesives are “tan” when dried, and most yellow wood glues are “yellow” when dried – making them poor choices for inlays since they reduce the visibility of the inlay material.
6. Insert the stone inlay first when using CA glue.
When using CA glue as the binder, first insert the stones and then apply the CA glue over the top. This is because CA glue polymerizes or hardens when it contacts dust, moisture, or other materials. If mixed with the stone inlay first, it could quickly become a lump of hardened glue, which would be difficult to spread smoothly in a recess.
7. Use “thin” CA glue when applying over a crushed stone powder inlay.
The thin CA glue will flow through the material, being absorbed, then wick to the bottom of the recess or crack – securely holding the inlay in place.
8. Consider applying wax or sanding sealer to the surrounding areas.
When using CA glue as the binder for a stone inlay, consider applying wax or sanding sealer to the surrounding areas. The wax or sanding sealer will keep the CA adhesive from staining the surrounding wood as the stone is build up in the recess or crack. Sealing off the surrounding area also results in having to spend less time remove glue and excess inlay from the wood.
9. First mix the inlay with the resin.
When using an epoxy to bind an inlay material first mix the mixed the inlay material and the resin and then add the hardener. By first mixing the inlay and resin together, you are not shortening your working time. Furthermore, using this approach you are more likely to get everything thoroughly mixed.
10. Understand the difference between “working time” and “cure time.”
The term “5-minute epoxy” means it has a working time of 5 minutes. This is the time you have before the adhesive starts setting. Do not confuse this time with cure time. Depending upon the brand, the cure time for “5-minute epoxy” will vary from 1 hour to 24 hours. See Tips on Glue and Adhesives for more information on epoxy and other types of glues.
11. Sand pieces very smoothly before creating a Lichtenberg figure with electricity.
If you aggressive sand after the figure or pattern has been created, then you will lose some of the detail. In other words, you will remove the “small branches” on the tree like figure.
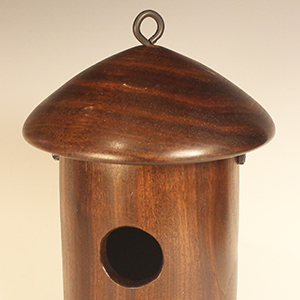
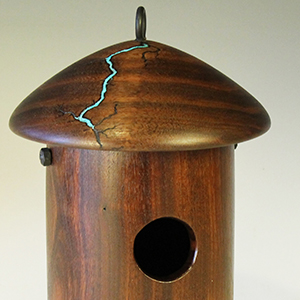
12. Use an inlay material to add contrast to pieces created from a single type of wood.
For example, after creating the birdhouse shown below, I felt the piece was a little dull and boring. In retrospect, I felt the birdhouse would have benefitted from using two different types of wood. However, I had already created the piece, I simply added a turquoise inlay to give the piece a little more character and create a more distinctive piece.
Looking for more WoodWorking Tips and Tricks?

Looking for more WoodWorking Projects and Plans?

You will also find patterns of all 50 US States.