Scroll Saw Tips (A Comprehensive Guide)
Helpful SCROLL SAW Tips for the BEGINNER – including pointers on stack cutting, buying a used scroll saw, and types of blades. Scroll sawing has grown in popularity over the last few years. Men, women, and children are discovering the joy in using a scroll saw to produce detailed art work. Some people make items for themselves or presents for others. Still other people make items to sell at local art and craft shows. Two things which make scroll sawing attractive to many people are the low startup costs and relative safety. For people looking for an inexpensive way to get into woodworking, the scroll saw might be their answer. For under $200 dollars you can get started.
The second thing attractive with the scroll saw is the relative safety. Scroll saws are probably one of the safest power tools to operate. Unlike other woodworking equipment, it is unlikely someone will get seriously hurt operating a scrollsaw. With proper supervision, even children can learn to operate a scroll saw. Personally, I was 10 years old when my Dad got me a scroll saw. Just make sure to follow all safety guidelines and manufactures recommendations. Enjoy the craft, but keep safety in mind.

1. Test drive – before buying.
If buying a used scroll saw make sure you see it run first. A good scroll saw will run smoothly and quietly. As the blade goes up and down it should appear as a thin black line. If the blade is blurry, the scroll saw is out of balance or alignment. This might be easy to fix or it might be a permanent flaw.
2. Consider blades when purchasing a saw.
One of the biggest decisions to make when buying a scroll saw is whether to get a machine which takes “pin-end” blades or “plain-end” blades.
- Pin-end blades – have a tiny cross pin on both ends. These pins rest in hook shaped holders. The big advantage of blades with pins is they can be quickly changed and the tension is consistently and automatically set as you change from one blade to the next.
- Plain-end blades – are totally flat. These blades are fastened using two clamps – one below the table and one above the table. These blades are widely available in many different teeth configuration. The big advantage of plain end blades is they can fit through very small holes found in many projects. Most scroll sawers consider plain-end blades the standard.


3. Scroll Saw Tip – Install good lighting.
Adequate lighting is essential so you can see pattern lines and create accurate cuts. In addition to good shop lights, you might want to consider mounting an adjustable flexible light on your scroll saw which allows you to bring in light from various angles.

4. Consider magnifying glasses.
Magnification provide extra precision helping you create delicate, detailed work. Magnification along with good lighting can also can help reduce eye strain and fatigue when working with small, detailed patterns. Three common options for magnification are A) using regular reading glasses, B) using a head mounted magnifying glasses (shown below), or C) mounting a magnifying glass lens on your scroll saw. To help provide both better lighting and magnification, you might want to consider adding a magnifying LED work light similar to the one shown above. These lights include a flexible neck or movable arm which allows them to be easily relocated. Some of these lights include two different types of bases – one magnetic and one for clamping.

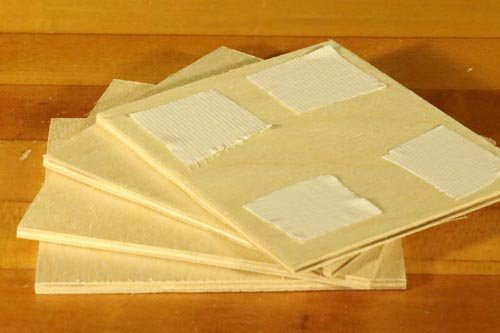
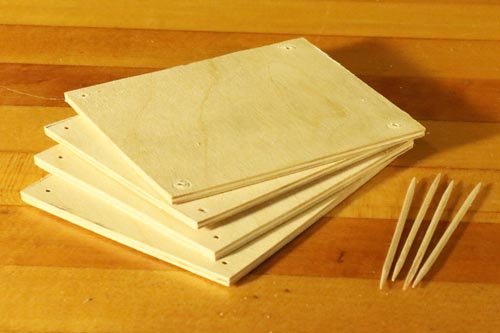
5. Learn to cut multiple pieces at the same time (stack cutting).
At some point, you might be working on a project which requires multiples of the same piece. Other times you might want multiples of a project. Regardless, stack cutting can make you more efficient and make your hobby more profitable by cutting multiples patterns at once. By cutting 4 pieces at the same time, you can cut your production time by approximately 75%. The stack pieces also provide extra support when cutting detailed patterns with delicate and fragile areas.
To perform stack cutting, first stack the pieces of wood you plan on using with the “good” sides all facing the same direction. At this point, there are several ways to hold the pieces of wood together including those listed below. Some scrollers even use a combination of approaches to make sure the pieces do not move.
- A. Place double side tape between the layers.
- B. Wrap tape around the outer layers.
- C. Glue the layers together.
- D. Insert toothpicks or small nails in the waste area.
A. Place double sided tape between the layers.
When using this approach, most scroll saw artist use double sided carpet tape. This approach is easy to set up and when done properly the layers cannot move. To get started simply place pieces of double side tape on the first layer of wood. Then place the second layer of wood on top of this one. Repeat with the remaining layers of wood. One advantage of this approach of stack cutting is that the pieces of wood can be different shapes and sizes.
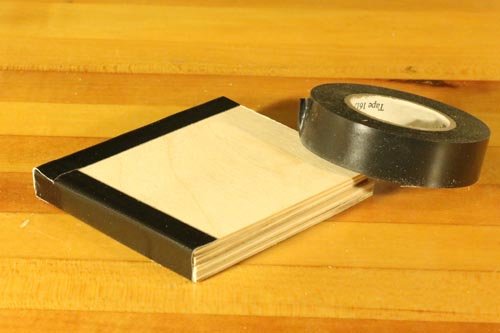
When stacking pieces using the options B-D, I first make sure the wood is flush on all sides. I then temporarily clamp the wood together using at least two clamps. Note: when using these approaches, make sure to do all of your internal cuts before cutting the perimeter – so your layers are held together the entire time you are cutting. Furthermore, as the pieces of the perimeter are cut off, you may need to re-secure the pieces so they do not move with respect to each other.
B. Wrap tape around the outer layers.
Simply tape the pieces together using tape. Some scrollers only go around the perimeter of the stack and other scrollers cover the entire surface with tape. This method is probably the quickest to set up. While almost any type of tape with work (I have heard scrollers use everything from painter tape, masking tape, duct tape), most scrollers prefer clear packing tape. This tape not only holds the pieces together, but also allows you to see the pattern. Black tape was used in the example image below, only because it is easily to see than clear tape.
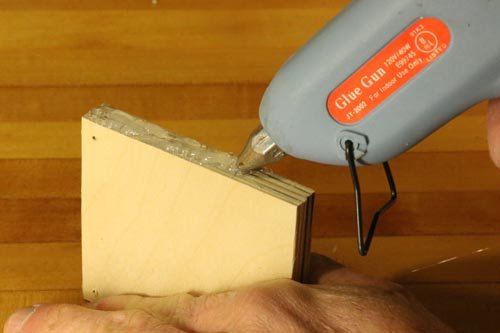
C. Glue the layers together.
After stacking and clamping the pieces together, apply glue on the outside ends. Some scrollers use wood glue and others prefer hot glue on the ends. After the glue has cooled and/or dried, you can remove the clamps and start cutting.
D. Insert toothpicks or small nails in the waste areas.
Some scrollers use toothpicks or small nails (e.g., brad nails) to help hold the layers together. If using brad nails, first position the stack over a piece of metal (e.g., an old circular saw blade). This way when the nail is driven into the wood, it will clinch the brad bending it back into the wood (i.e., similar to how a staple bends when stapling multiple sheets of paper together). Before cutting, hammer down any exposed nails to prevent scratching the saw table.
If using toothpicks, first drill holes using a drill bit which has approximately the same diameter as the tooth picks. Apply a little glue to the toothpicks and slide them into the holes. After drying, sand the excess portion of the toothpicks off. The advantage of wooden toothpicks over brad nails, is toothpicks will not scratch your table, and you will not ruin a blade if you accidentally cut through one.
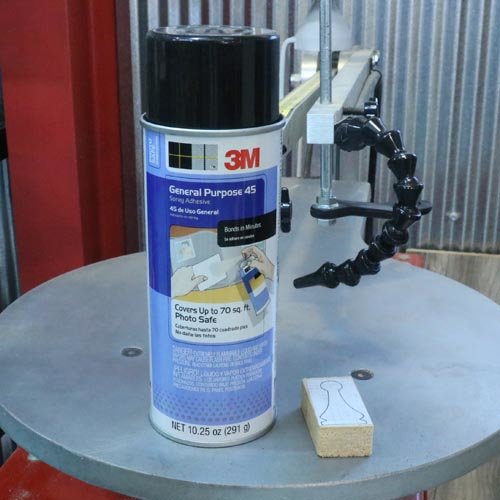
6. Consider using a spray adhesive to apply patterns.
Most scrollers today simply glue a photocopy of a pattern directly onto the surface of the workpiece. The scroll saw cuts through both the pattern and the wood. When finished cutting, the pattern can be effortlessly removed. Personally, I spray the backside of the pattern rather than the wood. This way if I am a little careless, at least the wood is not sticky to handle.
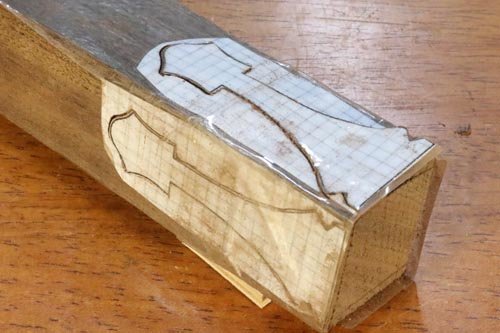
7. Experiment with compound sawing (also known as three dimensional sawing or double sawing).
This technique allows you to create projects which do not look like they were created on a scroll saw. The pattern is applied to two sides of the blank of wood. Ideally find patterns which have a dotted fold line. In this case, create a sharp crease on the fold line. Then carefully place the crease onto the corner of the blank. It is important that the blank be perfectly square. The figures below show a chess piece being created using compound sawing. See create your own chess pieces for more information.


8. Use a clamp when cutting small parts.
To keep your fingers from getting excessively close to the blade, use a clamp when cutting smaller parts as shown below.

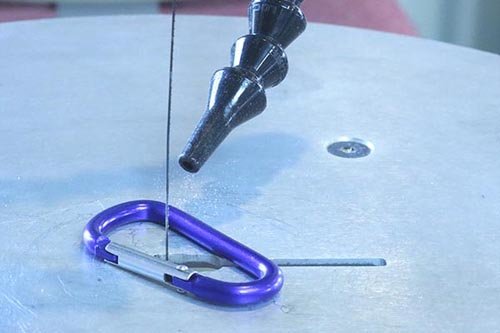
9. Release tension on the blade.
To extend the life of a scroll saw, most people recommend realizing the tension on the blade when the saw is not in use. This reduces the stresses on the holder, bearings, and other moving parts. Personally, after releasing the tension, I place a Carabiner clip around the saw blade. This is my reminder that the blade needs to be tightened before turning on the saw.
10. Dip the Tips of Scroll Saw Blades in Paint
Trying to determine which way the teeth on a scroll saw blade are pointing can be a little challenging. Consequently, this can add a few seconds to changing blades. To help speed up changing blades, someone taught me the following trick. When opening a new box of blades, I now carefully determine which side of the blade should be up when installed. I then dip these tips into blue paint as shown below. The reason for blue paint is because the sky is blue so up is blue. Hopefully, the floor of your shop is not painted blue!

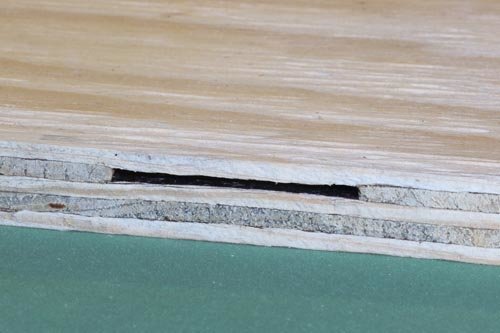
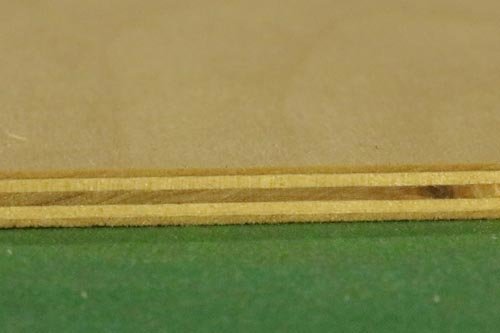
11. Wood Selection for Scroll Saw Projects
When selecting wood for scroll saw projects, I recommend using either solid wood or plywood with a void-free core (e.g., baltic birch plywood). After spending possibly hours cutting out a pattern, the last thing you want to see are voids between layers of wood veneer.
12. Have fun!
Common scroll saw projects
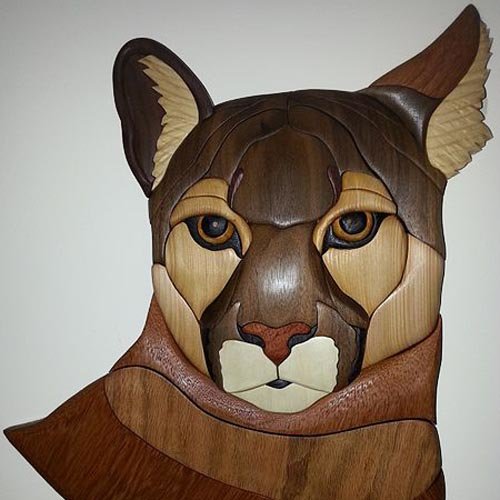
A few common projects people create on the scroll saw include: puzzles, ornaments, Intarsia, and fretwork. Intarsia is precisely cutting individual pieces of a pattern (typically in various types of wood). These pieces are then sanded and fitted together to create the final piece (see the example below).
Some common scroll saw brands include: Hawk, DeWalt, Delta, Dremek, Proxxon, Rockwell, Shop Fox, Hegner, General International, Excalibur, Central Machinery, and Montgomery Ward.
More Scroll Saw Patterns, Clip art Design, and Tips
- 100+ Free Scroll Saw Patterns
- Christian Scroll Saw Patterns
- State Outlines (All 50 States)
- Create Your Own Chess Pieces
- Printable U.S. Maps
- Practice Pattern for the Scroll Saw
Looking for more WoodWorking Tips and Tricks?

Looking for more WoodWorking Projects and Plans?

You will also find patterns of all 50 US States.