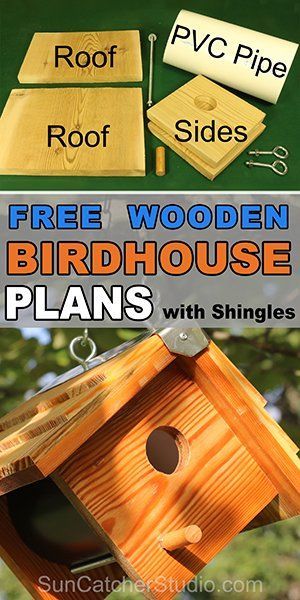
Wooden Bird Box (Easy DIY Birdhouse Plans)
Below are simple, free DIY wooden bird box plans that can be used to attract bluebirds, swallows, chickadees, nuthatches, warblers, woodpeckers, wrens, and other birds to your backyard or garden. This simple birdhouse (nest box) can be made from some wood and piece of PVC pipe or a recycled coffee can. See more bird houses and bird feeders.
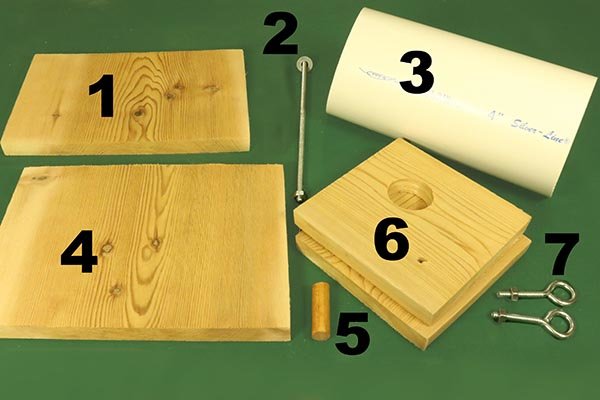
Materials Needed to Build this Wooden Bird Box
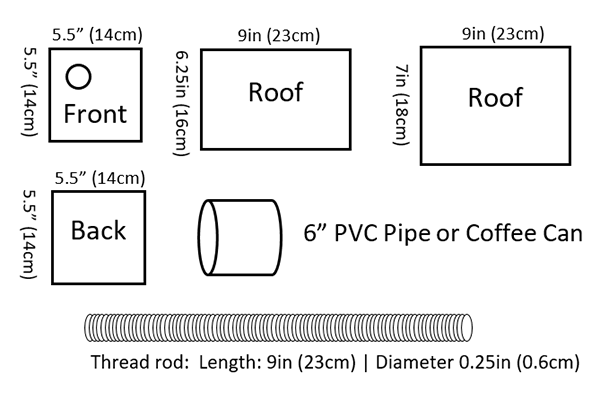
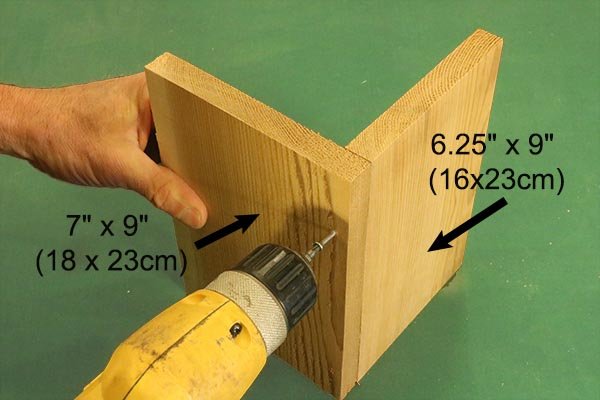
- Wood: 6.25in (16cm) x 9in (23cm)
- Threaded rod: Length 9in (23cm) | Diameter 0.25in (0.6cm)
- PVC Pipe or Coffee Can: Length 6in (15cm) | Diameter 4in (10cm)
- Wood: 7in (18cm) x 9in (23cm)
- Wooden dowel for perch: Length 1.5″ (4cm) | Diameter: 0.5″ (1.3cm)
- Wood (2 pieces): 5.5in (14cm) x 5.5in (14cm)
- Eye bolts (2): 1/4″ (0.6cm) diameter, approximately 2″ (5cm) in length.
OPTIONAL: Door shims for shingles, aluminum angle iron or copper for roof cap.
DIY Video Tutorial – Wooden Bird Box.
For an instructional video tutorial on building this wooden bird box see around 8:15 minutes into the following video.
Step 1. Cut out four pieces of wood using the bird box plans below.
Personally, I am using cedar. However, pine would also make a great choice.
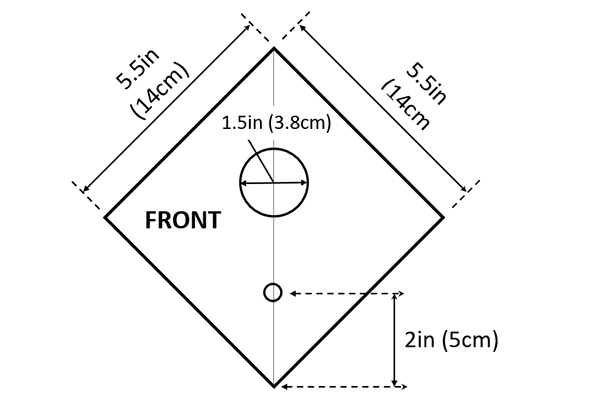
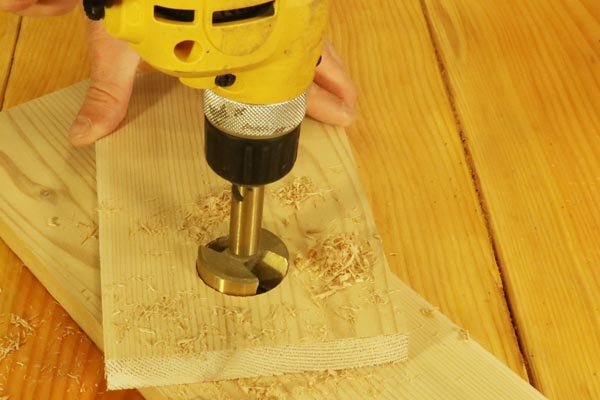
Step 2. Drill entrance hole and hole for threaded rod.
Drill a hole for the entrance using either a spade bit or forsnter drill bit. The plan above specifies a 1.5″ hole. This entrance hole size is the optimum diameter for bluebirds and tree swallows. However, chickadees, nuthatches, warblers, woodpeckers, and wrens will also gladly make this their home. See Bird House Hole Size if you want to attract a specific bird. Finally, drill a 1/4 inch hole for the threaded rod as illustrated above.
Step 3: Pre-drill the holes.
Drill pilot holes to help prevent the wood from splitting. Ideally this hole should be at least as large as the screw’s minor diameter.

Step 4: Assemble the sides and roof of the birdhouse.
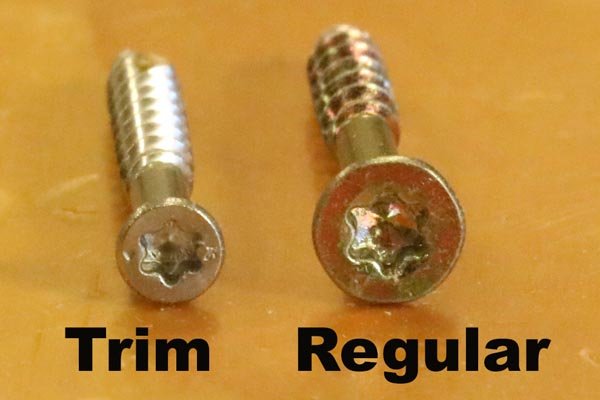
Use a combination of glue and screws to attach the roof, front, and back of the birdhouse together. Start with the roof. Note: the width of one of the top panels on the roof is 3/4″ less than the other panel. When fastened together (as shown below) this will make the overhang the same on both sides. A waterproof wood glue will help extend the life of the birdhouse. Personally, I recommend using trim screws as shown below. The smaller screw head is less obvious and helps prevent the wood from splitting. If you pre-drill the holes, these screws will countersink themselves nicely because the head is not much larger than the pilot hole.
Step 5. Optionally add shingles and decorative roof cap.
Use wooden door shims on the roof to create the look and feel of wooden shingles. Use numerous clamps to hold the shims in place until the glue dries. You might want to use a piece of aluminum or copper angle iron to create a more finished look.


Step 6: Finish Assembling Nesting Box.
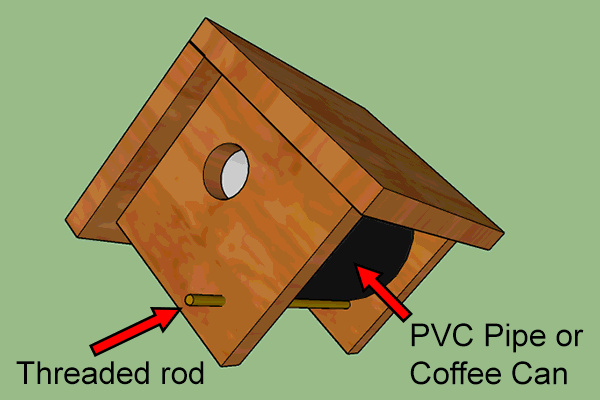
Drill a couple 1/4″ holes in the PVC pipe or coffee can for drainage. Next insert the PVC pipe, coffee can, or equivalent between the two sides of the birdhouse. Then insert the threaded rod. The threaded rod not only holds the PVC pipe in place, but it also provide a perch. Optionally, cover the exposed threaded rod with a wooden dowel. By removing the threaded rod, you can access and clean out your birdhouse. Find more information on cleaning your birdhouse.
Step 7. Paint or finish your birdhouse.
In my case, I applied a linseed-oil. This finish helps accentuate the grain and helps make the wood more resistant to damage.

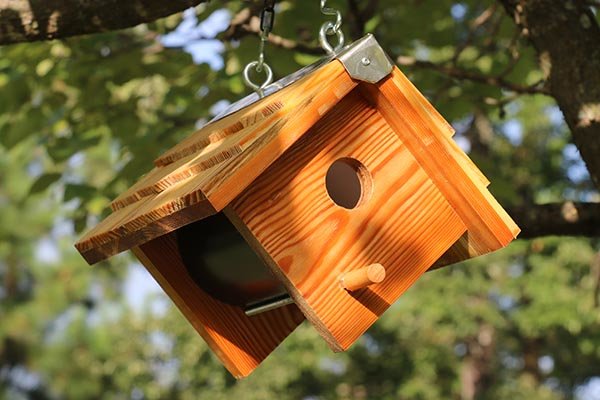
Step 8. Hang or mount your birdhouse.
Mount your birdhouse and see which bird will call your habitat home. See How to Hang a Birdhouse for tips on location, mounting, and placement. Your new birdhouse should provide you excitement for many seasons to come.
Related Articles on Bird Houses, Bird Feeders & More


Use these free DIY bird house plans and bird feeder plans to attract bluebirds, chickadees, flickers, finches, house sparrows, hummingbirds, kestrel, nuthatches, owls, purple martins, swallows, thrushes, warblers, woodpeckers, wrens, and other birds to your garden.