DIY Sharpening System (Belt Sander)
Today there is an increasing variety of sharpening systems available on the market including: water cooled systems, dry sharpening systems, jigs, gadgets, grinding tool rests, etc. to help you hold and sharpen your turning tools. Personally, I have used numerous approaches, all with success. However, you will quickly find some of these sharpening systems can be expensive and somewhat time consuming to set up and use.
")
Looking for a quicker approach, I tried simply inverting my belt sander and sharpening a gouge. To my surprise, I was amazed at the results. In seconds, I had created a super sharp cutting tool.
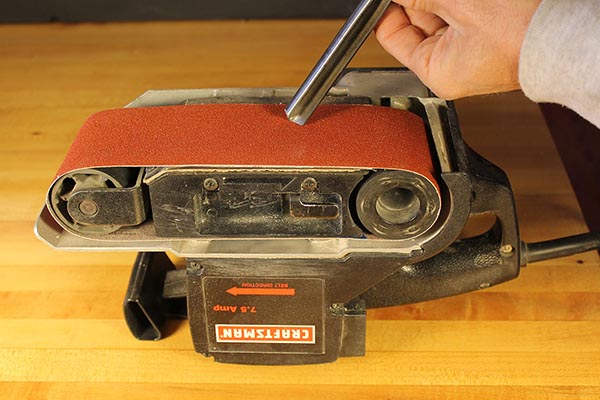
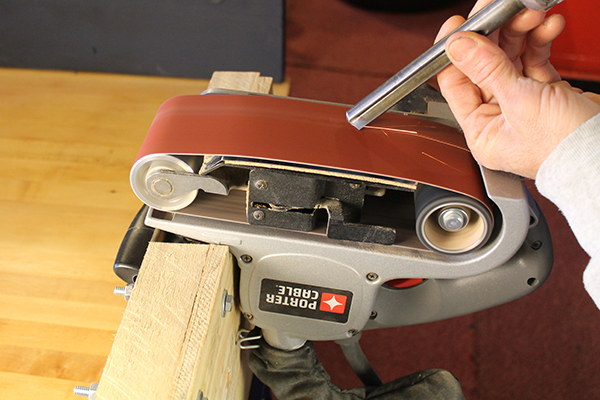
To create your belt sanding system from a belt sander simply install a 40 to 80 grit belt on your belt sander and then invert it. I use a coarser belt for shaping tools and a finer belt for creating a very sharp edge. If you own a belt sander like the Craftsman shown below where the cord and the “dust collection system” exhaust from the side, you can simply flip your belt sander over and you are ready to go. However, if you own a belt sander (like the Porter Cable shown below), where the cord or dust collection system exhaust from the top, you will need to create a jig to hold your sander. In my case, I created a jig from a piece of plywood, two short pieces of 2×2, a metal strap, and a few bolts. Now when inverted, my belt sander can be held securely in place. Depending on your belt sander, you might have to configure your jig differently.
Listed below are several reasons, why the belt sander makes a great sharpening system:
1. Allows local purchasing.
You can purchase the sanding belts locally from almost any hardware or lumber store. You will find smaller stores do not stock some of the accessories for sharpening systems (like discs, sanding sleeves, drums, pads, and specially sized sandpaper or abrasive wheels). However, most lumberyards will carry common sanding belt sizes.
2. Allows belts to be changed in seconds.
This allows you to quickly change from sharpening to reshaping tools.
3. Requires minimal space.
For anyone with limited space, a dedicated sharpening system may crowd the shop even more.
4. Reduces the amount of material removed during sharpening.
The amount of material removed is very minimal. The bottom of most belt sanders have a cushion (e.g., a cork rubber plate). I find the turning tools remain very steady (no vibrations) on this plate – making it very easy to sharpen tools without removing much material. A typically gouge can be sharpen hundreds or thousands of times using a belt system. To help you determine if you are removing too much material, blacken the bevel of the tool you are sharpening. Now when you touch the bevel to your sharpening system, you will be able to see where the sharpening is occurring. Ideally, within just a few seconds you should be removing all of the blacken surface on the bevel.
5. Produces an “optimal” sharp edge in seconds.
It typically takes me about 10 to 20 seconds to create a sharp edge on most turning tools. The ability to produce a very sharp edge, might explain why most knife manufactures use belt systems for sharpening the knives they produce.
6. Encourages “free hand” sharpening.
While jigs could be added, the approach shown above forces you to sharpen your tools “free hand.” While you initially may want the comfort and guidance a jig may offer, I quickly found that with just a little practice “free hand” sharpening reduced sharpening time down to seconds. Like me, you might also realize 1) even a tool with an imperfectly shaped bevel can still cut perfectly, 2) you are more likely to have sharp tools when you have access to a system that is quick and easy. Learning how to free hand sharpen tools takes practice, just like everything else. But from my experience, once someone understands the profile and theory behind a tool, they can usually consistently re-sharpen the tool. For example, with gouges, once someone understands the phrase “riding the bevel” and is comfortable with this cutting technique, they usually know the profile of the tool. At which point, they can usually sharpen the tool successfully using the free hand method.
7. Saves money.
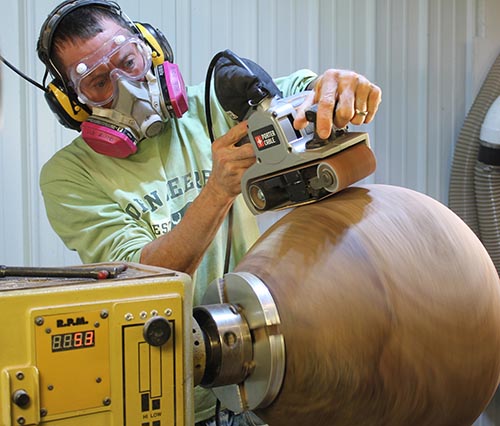
You can purchase a belt sander for less money than most sharpening systems. Plus in addition to sharpening tools, the belt sander makes an excellent tool for other sanding applications. For example, I frequently use mine to sand the exterior of large pieces as shown below. This can be a huge time-saver especially on larger pieces mounted using a chuck. In these cases, I cannot risk a fast lathe speed or the piece might fly off the lathe. Notice in in the figure, the lathe speed is speed to only 53 rpm. Hand sanding at this speed would be very slow, in comparison to the belt sander. A friend of mine, once told me he got a belt sander for Christmas. When he got it, he said it was one of the most time-saving tools he has ever purchased.
The inverted belt system will allow you to quickly sharpen gouges, parting tools, and skew chisels.
Note: When recommending turning tools to beginners, my advice is to first purchase one or two carbide tip tools with replaceable cutters. These tools will help beginners avoid frustrations with dull tools and will allow them to postpone an investment in a sharpening system. Eventually, the beginner will want to do less sanding and will explore tools like gouges which perform a shear cut rather than a scraping cut. At which point, a sharpen system becomes inevitable. See “Things to Look for in a Great Sharpening System” if you have a little extra money and want consistent, repeatable results.
The thrifty, economical, frugal, penny-wise, resourceful way of sharpening tools.
Pin for later!