Best Wood Finish (Tips, Secrets, & Techniques)
What is the best wood finish? When I first got into woodworking, I slowly accumulated a huge collection of wood finishes. This included polyurethane (acrylic and oil based in both satin and clear), oils (mineral, walnut, linseed, and coconut); stains (colonial maple, walnut); high friction polishes, waxes (Tripoli, white diamond, Carnauba, natural beeswax, yellow beeswax), milk paint in various colors, etc. I was always looking for the “perfect” wood finish. One that was easy to apply, provided protection, and enhanced the appearance of a piece. Sometimes I wanted a food-safe finish and other times I did not care. Before long, my cabinet was looking like a hardware store!

As the number of oils and finishes in my shop increased, my ability to identify the type of finish applied to any given piece decreased. If I were selling the pieces, as soon as I finished them – the ability to correctly identifying the finish would not matter. However, many times one of two things would happen. I would decide to fix a small flaw in a piece (e.g., maybe a lid on a box had become a little too tight). Secondly, what I initially thought was a masterpiece, I would later decide could you some additional work. For example, maybe in different lighting, I would notice some grain tear-out that was not adequately sanded. Maybe you are like me, and initially thought the finish was going to hide some flaws!

With a huge array of finishes, trying to fix or touch-up a piece can become a game a chance. Did I apply walnut oil or linseed oil? Was the polyurethane acrylic or oil-based? Is the finish a satin or clear? Was the piece finished with carnauba or a high friction polish, etc.? At which point, if you decide something needs additional work a couple options might include:
- Record or label the bottom of every piece with the type of finish(s) applied.
- Remove all finishes and start over.
To simply finishing and touching-up pieces, I now only keep a few finishes on hand and recommend this to other woodworkers and woodturners. Personally, I reduced the number of my finishes to five products. I accomplished this by dividing my pieces into two categories (food safe and artistic pieces) as shown below. Now if a piece needs an extra finishing touch, I know precisely what to apply and how to fix the problem, without having to refinish the entire piece.
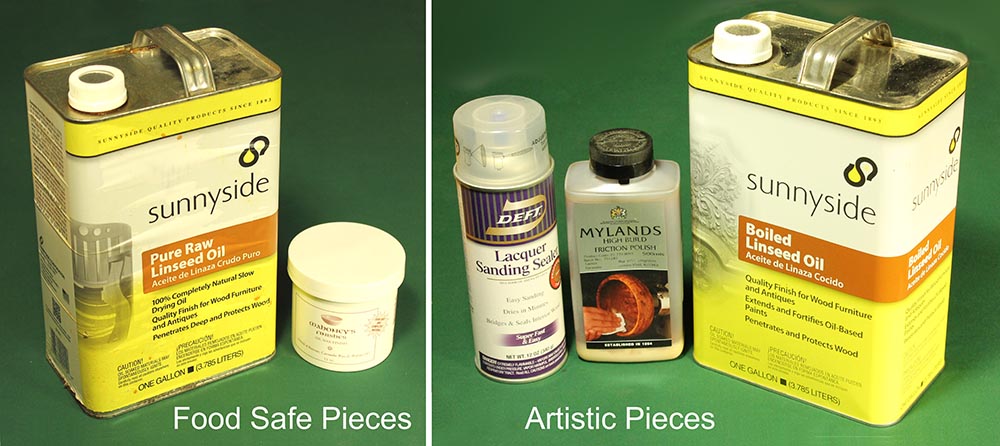
Utilitarian Pieces (Kitchen items)
For functional pieces that I use to handle or store food (e.g., salad bowls, rolling pins, scoops, etc.) I apply only known food safe finishes. Here I limit my finishes to the following two options.
A. For a natural, non-glossy, matte look, I apply only oil. A few food safe oils include raw linseed oil, pure tung oil, and walnut oil. Personally, I use pure raw linseed oil which is oil squeezed from flax seed and then packaged. None of the oils just listed contain preservatives, additives, or drying agents. The drawback to these oils is that they slowly dry, possibly taking weeks to fully cure. When applied, these oils will accentuate the grain making. The piece will initially have a wet look. However, over time, the wood will absorb these oils and will slowly dry. The piece will slowly lose its luster and shine – giving the piece more of a flat, aged look.
B. For a glossy, shiny, polished sheen on a functional piece, I combine a food-safe oil with a food-safe wax. To save time, I personally use Mahoney’s Food-Safe finish. The ingredients in this finish include beeswax, carnauba wax and walnut oil. While I like the convenience of this finish, you could achieve the same look by first applying a food safe oil, and then later applying a food-safe wax.
Artistic Pieces
For nonfunctional, purely aesthetic pieces, I tend to use finishes that quickly dry. Similar to utilitarian pieces, I limit my finishes based on the desired result.
A. For a natural, non-glossy, matte look, I apply only a quick drying oil. The two most commonly used drying oils are tung oil and boiled linseed oil. The manufacturers mix these oils with petroleum-based solvents and dryers to accelerate the drying process. These oils will provide long-lasting protection while also accentuating the grain adding beauty to the wood. Initially the oil will give a piece a wet look. As the oil dries (maybe in under 24 hours), the finish will lose some of its luster. This will give the piece more of a flat, aged look.
B. For a glossy, shiny, polished, glassy look, I first apply a quick drying oil and then apply a topcoat finish. A few finishing topcoats include polyurethanes, shellacs, lacquers, varnishes, and high friction polishes. Personally, for small items like pens, I use Mylands High Build Friction Polish. This polish builds very quickly and dries almost instantly giving the piece a brilliant high glossy finish.
For larger pieces (especially spalted and porous woods), I use a sanding sealer which dries in approximately one hour. The sanding sealer quickly fills in the pores. Without a sanding sealer, the wood can suck up the finish as if you did not apply a finish. After one or two coats of sanding sealer, most pieces have a high-glossy finish. The sanding sealer I use recommends the application of a top coat of a clear wood finish. However, I have found this step unnecessary for artistic pieces that I rarely handle.
See “Wood Finishing Tips” for more information on applying finishes including waxes, oils, stains, dyes, polyurethane, and shellac.
Looking for more WoodWorking Tips and Tricks?

Looking for more WoodWorking Projects and Plans?

You will also find patterns of all 50 US States.