Table Saw Tips (Cabinet, Portable & Benchtop Models)
Table saws can quickly and accurately cut long, straight, ripping cuts (with the grain) or they can make cross cuts (against the grain). A table saw can also make miter and bevel cuts. This power tool is one of the most versatile and commonly used tools in the shop. Unlike portable saws, a table saw can repetitively create very precise, accurate, and clean cuts.

Table saws come in all different sizes. On the small end are micro table saws with 2” (5cm) diameter blades, 1/10 HP (75watts) electric motors, and which take up only 7” x 10” (18cm x 25cm) of valuable workbench space. On the larger end are large cabinet table saws with 10” (25cm) diameter blades, 5HP (3728watts) electric motors, and may occupy a space as large as 30” x 75” (76cm x 191cm) with extensions. Regardless of the size, rigidity and a ripping fence that remains parallel to the blade are key factors to look for in a table saw. Before operating a table saw, it is important to understand how to operate the saw safely and how to create clean cuts. Following are some helpful tips when operating a table saw.
1. Realize that table saws only tilt 45 degrees in one direction.
Most table saws will tilt 45 degrees to either the right or the left. But not both. Some table saws will provide a little flexibility by tilting 47 degrees in one direction and -2 degrees in the other direction. However, there are no commonly sold table saws that can tilt 45 degrees in both directions. In general, right tilting table saws are more common than left tilting table saws.
2. Know your saws “maximum cutting depth”.
The maximum cutting depth for table saws varies slightly from one manufacturer to the next. However, if you review the top ranked table saws, you will find almost all 10” (25cm) table saws have a maximum cutting depth between 3.2” (8cm) and 3.5” (9cm) at 90 degrees.
3. Know when to use a push stick for cutting pieces on a table saw.
When operating a table saw, it is recommended to always use a push stick for the following operations:
A. Cutting pieces less than 12” (30cm) in length.
B. Cutting the last 12” (30cm) of a longer cut.
C. Removing any scraps left on the table.
D. Ripping materials narrower than 6” (15cm).
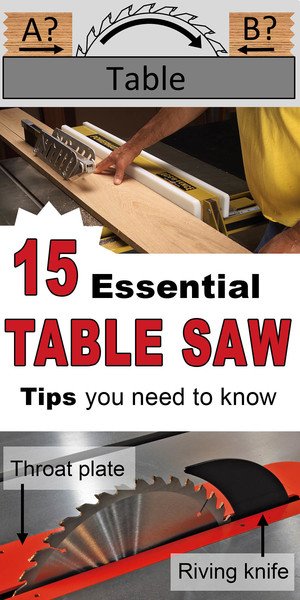
4. Know the recommended feed direction on a table saw.
Most operating manuals specify that you feed the workpiece into the saw blade against the direction of rotation (i.e., workpiece B). This implies you introduce the wood into the blade as the teeth are going downward. If you feed the wood into the table saw in the opposite direction, then both the workpiece and your hand could be pulled into the saw blade.
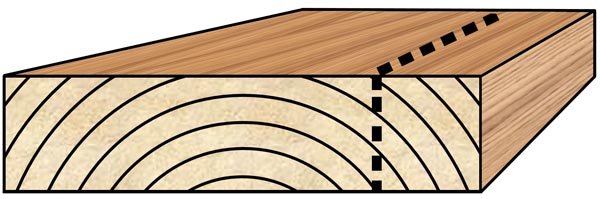
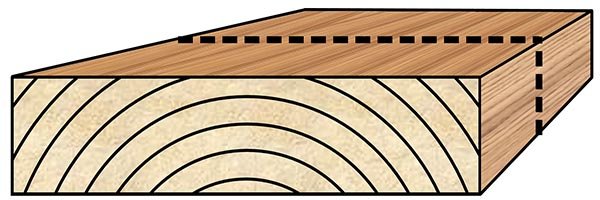
5. Know the difference between cross-cutting and ripping.
Cutting along the dashed line in the image below would be a ripping cut. A ripping cut slices a board with the grain. On the other hand, cross-cutting slices a board across its grain. When cross-cutting a board on a table saw, a miter gauge or cross-cut sled is recommended.
6. Realize that saw blades for ripping have fewer teeth.
A 10” (25cm) saw blade designed for ripping lumber, might have only 24 teeth. These blades can remove material quickly. On the other hand, the same size saw blade designed for cross cutting lumber might have 60 to 80 teeth. A 10” (25cm) general purpose (combination blade) designed for both ripping and cross cutting might have between 40 and 50 teeth.
7. Use blades with more teeth to create cleaner cuts.
In general, a blade with more teeth will create cleaner cuts than a similar blade with fewer teeth. This is because there are more teeth cutting, and consequently less tear out. Blades with more teeth typically require a slower feed rate. However, the result is a cleaner cut.
8. Know the most common blade size for table saws.
The most common blade size capacity for a table saw is 10” (25cm) diameter with a 5/8” (1.6cm) arbor.
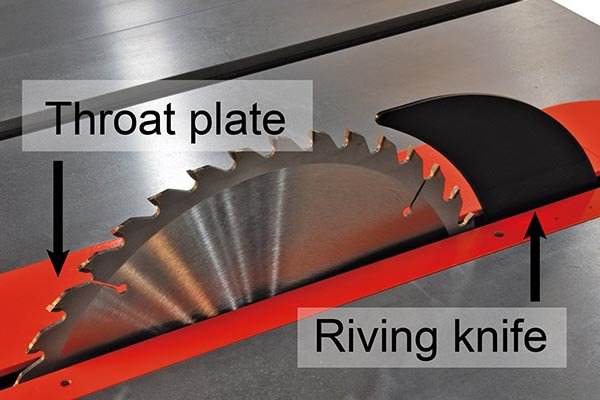
9. Install or use a riving knife for safety.
A riving knife helps prevent wood from jamming and kicking back towards the operator. A riving knife matches the curvature of the blade and is positioned approximately ¼” (6mm) behind it. The riving knife is mounted in such a way that it follows the blade as it is raised, lowered, and tilted. The top of the knife is positioned just below the top the blade, so it does not interfere with cuts that do not go completely through the wood.
Many experts feel the riving knife is one of the most important safety features of any table saw. It virtually eliminates all kickback. Kickback typically results when the kerf closes up and binds with the blade. This may happen because of poor rip fence alignment, not keeping the wood against the rip fence, operator error, or stresses in the wood that are released as the cut is being made. With a riving knife in place, the kerf cannot bind with the blade, thus eliminating kickback.
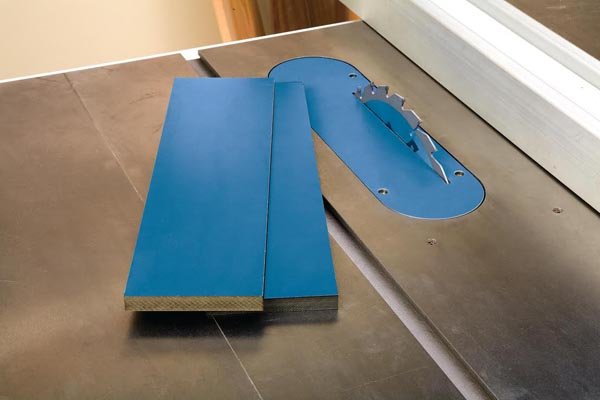
10. Consider using a “zero clearance insert.”
The throat plate that comes with a table saw has an elongated slot that is large enough to allow clearance over all possible tilting angles. This throat plate also allows the operator to install various blades – such as a thicker carbide-tip ripping blade. This large opening can cause tear-out on the bottom of a workpiece and may result in narrow pieces of wood jamming between the saw blade and the slot in the throat plate.
To overcome this problem, some people create a zero clearance insert so that the opening in the insert is the exact width of the saw blade’s kerf. You can create a new insert by cutting a piece of plywood, sheet material made from phenolic resin, etc. to match the size of the original throat plate. You then raise the saw slowly through the new throat plate creating a perfect fit. It is important to note that a zero clearance insert only works at one angle. For this reason, most people create a zero clearance insert for when the blade is at 90 degrees and another insert for when the blade is at 45 degrees.
11. Know the rip capacity of a table saw.
The rip capacity indicates the maximum space between the blade and the edge of the fence. If you wish to cut a rip a 48” x 96” (122cm x 244cm) piece of plywood into two 24” x 96” (61cm x 244cm) pieces, you would need at least a 24” (61cm) rip capacity.
12. Set the blade height so it is just slightly higher than the piece being cut.
The Center for Occupational Health and Safety recommends that blade height be set so it does not extend more than 1/8” (3mm) above the height of the piece being cut.
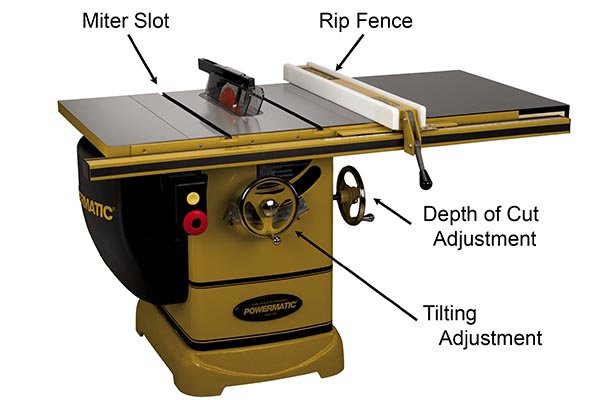
13. Be able to identify the major parts of a table saw.
A miter gauge rides in the corresponding “Miter Slot” to allow precise angled cuts. The “Rip Fence” keeps the wood parallel to the blade as you cut the workpiece. The “Depth of Cut Adjustment” raises and lowers the height of the blade. The “Tilting Adjustment” can tilt the blade for beveled cuts.
14. Be able to correctly identify the parts of a blade.
The “Expansion Slot” found on some blades reduces blade noise by dampening any vibrations. The “Shoulder” supports the “Carbide Tooth” which performs the actual cutting. The “Gullet” helps remove chips and dust out of the kerf cut.

15. Consider purchasing a table saw which has injury-mitigation.
Table saws with injury-mitigation activate a safety system stop if the operator contacts the blade during use. One example is the SawStop™ table saw. This saw will stop and drop the blade below the table top in less than 5 milliseconds if the blade comes in contact with human flesh. Another example of a table saw with injury mitigation is the Bosch REAXX™ table saw. Considering on the average there is a table saw accident in the United States every 9 minutes and 10 amputations every single day (source: http://www.sawstop.com), this technology is definitely worth considering.
Woodturners:
A few examples of when a woodturner would use a table saw include: creating blanks for pens, cutting pieces for segmented work, and removing the corners on square stock prior to mounting the piece on a lathe. Removing excess stock on the corners makes it much safer and easier to create items like kitchen scoops and rolling pins.
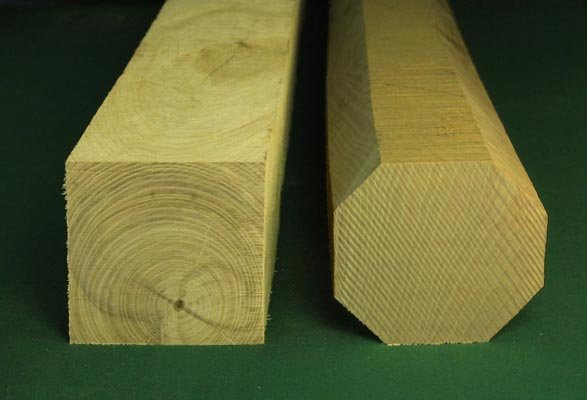
Table saw brands: Bosch, Craftsman, Delta, DeWalt, Genesis, Grizzly, Jet, Makita, Powermatic, Rockwell, SawStop, Shop Fox, Skil, Skilsaw.
Pin for later!
Looking for more WoodWorking Tips and Tricks?

Looking for more WoodWorking Projects and Plans?

You will also find patterns of all 50 US States.